Container Image Signing: A Practical Guide
Container image signing is the process of adding a digital signature to a container image, to ensure its authenticity and integrity.
What Is Image Signing?
Container images are an important part of the containerized application development process, as they allow applications to be packaged and deployed consistently across different environments, without the need to worry about dependencies or configuration.
Container image signing is the process of adding a digital signature to a container image, to ensure its authenticity and integrity. The signature is used to verify that the image has not been tampered with or modified in any way, and that it is the same image that was originally signed.
There are several ways to sign container images, including using private/public key pairs, and using trusted third-party certificate authorities. The most common method is to use a private/public key pair, where the private key is used to sign the image, and the public key is used to verify the signature.
Using this method, the user creates a private/public key pair and stores the private key in a secure location. The user then uses the private key to sign the image, and adds the signature and the public key to the image. When the image is run, the container runtime can verify the signature using the public key, to ensure that the image has not been tampered with.
This is part of a series of articles about supply chain security.
In this article:
The Need for Container Image Signing
Trust is a major concern for containers. Container image signing allows users to add a digital “fingerprint” to an image. This fingerprint can later be cryptographically tested to verify trust. This allows users of container images to verify origin and trust the content included in container images.
Containers package code, binaries, and libraries into an image. Once the image is ready, it can be uploaded to a container registry and shared with others. When the image is shared, it is essentially anonymous—it is difficult to verify the content inside or its source without cryptographic signatures.
To make matters worse, container images are often made up of layers of images controlled by multiple people and teams. This makes it even more difficult to ascertain what exactly was included in each layer of the image.
The main goal for end-users of container images is to verify the chain of custody (CoC). They must establish a trust relationship with any team that added files to the container image. All layers of a container image must be trusted by end users—otherwise using the container image represents a security risk.
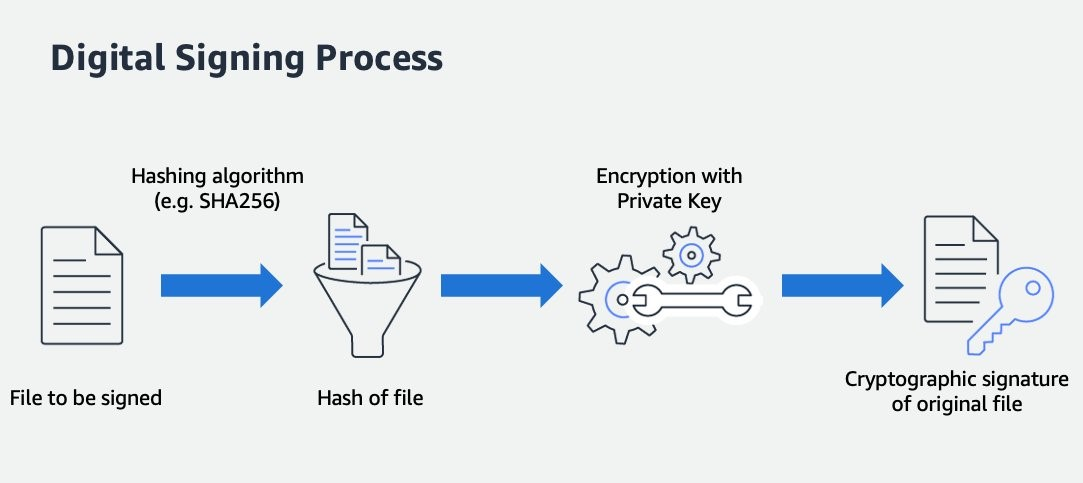
What Is a Cryptographic Signature?
A cryptographic signature is a digital code that is generated using a private key, and is used to authenticate the identity of the person or entity that created the signature. Cryptographic signatures are used to ensure the integrity and authenticity of digital documents, messages, and other types of data.
Cryptographic signatures use a process called asymmetric encryption, which involves the use of two keys: a private key, which is kept secret, and a public key, which is made available to others. When a user wants to sign a document, they use their private key to create a digital signature, which is a unique code that is based on the content of the document. The signature can then be verified using the user’s public key.
Cryptographic signatures are used for a variety of purposes, including authenticating the identity of the sender of a message, ensuring the integrity of a message or document, and providing non-repudiation (proof that the sender cannot deny having sent the message). They are an important security feature in many applications, including email, digital certificates, and financial transactions.
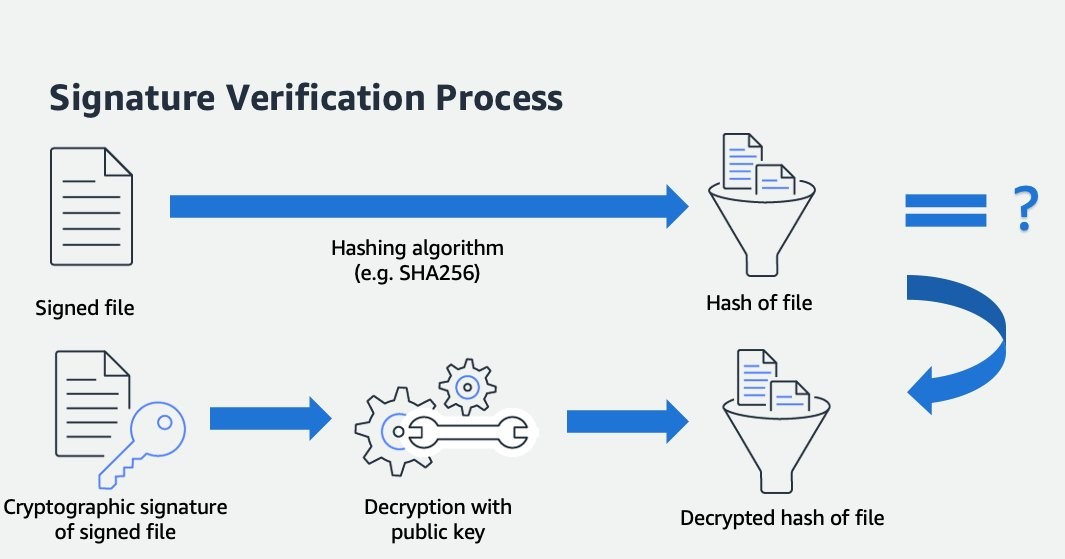
In the signature verification process, the hash of the document or message is calculated and compared to the hash that is included in the signature. If the hashes match, it indicates that the document or message has not been tampered with, and that it is the same as the original document or message.
Hashing is an important security feature, as it allows the authenticity and integrity of a document or message to be verified without needing to store or transmit the entire document or message. In some cases, a timestamp might be used to indicate when the signature was created.
It is possible for a container image to have multiple signatures, either from the same signer or from multiple signers. This can be useful in a variety of situations, such as when multiple parties need to sign the image to verify its authenticity and integrity, or when the image needs to be signed multiple times to meet different security requirements.
Steps to Create Image Signatures
Here is one way to automatically create image signatures—the process may differ depending on your tools, such as the container registry and orchestrator.
- Generate a private/public key pair: The first step in creating an image signature is to generate a private/public key pair. The private key is kept secret, and is used to sign the image. The public key is made available to others, and is used to verify the signature.
- Build the container image: The next step is to build the container image. You will need to create a Dockerfile, which is a text file that contains instructions for building the image.
- Sign the image: Once the image is built, you can use your private key to sign the image. To sign the image, you will need to use a command-line tool or API provided by the container runtime or image registry. For example, in Docker, you can use the docker trust command to sign the image.
- Share the signature store: After the image is signed, you will need to share the signature store with the appropriate parties. The signature store is a location where the signatures and corresponding public keys are stored. This could be a central location, such as a secure server, or it could be distributed across multiple locations.
- Validate the signature: To validate the signature of the image, you will need to use the public key that corresponds to the private key used to sign the image. The public key can be used to verify the signature at runtime, to ensure that the image has not been tampered with or modified in any way. You can use a command-line tool or API provided by the container runtime or image registry to perform the validation.
How to Verify Signed Container Images in Kubernetes
To verify signed container images in Kubernetes, you will need to use the kubectl command-line tool and the Kubernetes API. Here are the steps to verify signed container images in Kubernetes:
1. Fetch the public keys for the signatures
The first step is to fetch the public keys for the signatures. The public keys are used to verify the signatures of the container images. You can use the kubectl get secrets command to fetch the public keys from a secret store, such as a Kubernetes secret or a ConfigMap. Here is an example:
kubectl get secrets -n mynamespace mysecret -o yaml
This command will fetch the secret named mysecret from the namespace mynamespace, and output the secret in YAML format. The secret should contain the public keys for the signatures.
2. Verify the signatures of the container images
Once you have the public keys, you can use the kubectl command-line tool and the Kubernetes API to verify the signatures of the container images. To do this, you will need to use the kubectl command to retrieve the image from the container registry, and then use the openssl command-line tool to verify the signature using the public key. Here is an example:
kubectl get pod mypod -o jsonpath='{.spec.containers[*].image}’ | xargs -I {} bash -c “openssl dgst -sha256 -verify public.pem -signature {}.sig {}”
This command will retrieve the image for the pod named mypod, and use the openssl command to verify the signature using the public key stored in the file public.pem. If the signature is valid, the command will output “Verified OK”. If the signature is invalid, the command will output an error message.