Kubernetes on AWS
Learn about Kubernetes Node Components, Kubernetes vs. ECS, deploying on AWS using Kops, Kubernetes EKS, launching Kubernetes on EC2 using Rancher, scheduling Resources using Terraform, and more.
In this page, you’ll find everything you need to know about Kubernetes on AWS:
- Kubernetes on AWS
- Overview
- Kubernetes on AWS: Step by Step
- Deploying Kubernetes on AWS Using Kops
- Using Kubernetes EKS Managed Service
- Launching Kubernetes on EC2 Using Rancher
- Creating a Kubernetes cluster via Rancher in AWS
- Deploying Applications in the Kubernetes Cluster
- Scheduling Kubernetes Resources on AWS Using Terraform
- Specifying Kubernetes as Provider
- Specifying and Deploying Pods and Services
- Other Options for Deploying Kubernetes in the Cloud
- Summary
Overview
Amazon Web Services (AWS) is a popular cloud provider option for Kubernetes deployments, as it allows unlimited scaling of an enterprise containerized application clusters. AWS’ region availability all around the world means Kubernetes clusters can benefit from very low latencies. Additionally, the wide range of AWS services like S3 for raw storage or RDS for relational databases, it becomes easy to use Kubernetes for both stateless and stateful workloads integrated with native AWS services.
Kubernetes on AWS: Step by Step
In this article we provide step-by-step instructions for several common ways to set up a Kubernetes cluster on AWS:
- Creating a cluster with kobs – kops is a production-grade tool used to install, upgrade and manage Kubernetes on AWS. It supports Ubuntu, Debian, CentOS and RHEL, can generate Terraform templates, supports custom Kubernetes add-ons. Learn more ›
- Creating a cluster with Amazon Elastic Kubernetes Service (EKS) – the managed Kubernetes service provided by Amazon. You can create a Kubernetes cluster with EKS using the AWS Management Console. Learn more ›
- Creating a cluster with Rancher – Rancher is a Kubernetes management platform that eases deployment of Kubernetes and containers. It provides a convenient UI and integrates with LDAP, AD, and GitHub. Rancher runs on RancherOS, which is available as an AMI that can be deployed on any EC2 instance. Learn more ›
- Creating a cluster with Terraform – Terraform is an infrastructure-as-code tool that can deploy containerized applications into an properly configured Kubernetes cluster running in AWS. Learn more ›
- Other ways to deploy Kubernetes on AWS – we briefly review other tools you can use, including Heptio, kubeadm, and OpenShift. Learn more ›
Deploying Kubernetes on AWS Using Kops
Kops is a production grade tool used to install, upgrade, and operate highly available Kubernetes clusters on AWS and other cloud platforms using the command line. Kops is capable of generating Terraform templates with support for multiple CNI networking plugins and custom Kubernetes add-ons.
Installing a Kubernetes Cluster on AWS
Before proceeding, make sure to have installed kubectl , kops , and AWS cli tools.
Configure AWS Client with Access Credentials
Make sure AWS IAM user has the following permissions for kops to function properly:
– AmazonEC2FullAccess
– AmazonRoute53FullAccess
– AmazonS3FullAccess
– IAMFullAccess
– AmazonVPCFullAccess
Configure AWS cli with this user’s credentials by running:
# aws configureCreate S3 Bucket for Cluster State Storage
Create a dedicated S3 bucket which will be used by kops to store the state representing the cluster. We’ll name this bucket my-cluster-state :
# aws s3api create-bucket --bucket my-cluster-stateMake sure to activate bucket versioning to be able to later recover or revert to a previous state:
# aws s3api put-bucket-versioning --bucket my-cluster-state --versioning-configuration Status=EnabledDNS Setup
On the DNS side, you can go with either public or private DNS. For public DNS, a valid top-level domain or subdomain is required to create the cluster. DNS is required by worker nodes to discover the master and by the master to discover all the etcd servers. For a domain whose registrar is not AWS, create a Route 53 hosted zone on AWS and change nameserver records on your registrar accordingly.
In this example we’ll be using a simple, private DNS to create a gossip-based cluster . The only requirement to set this up is for our cluster name to end with k8s.local .
Creating the Kubernetes Cluster
Note that all kops commands below that include --yes option can be run first without it to just show which changes would take place (for example, which AWS resources will get created or destroyed when running the command with --yes option).
The following command will create a 1 master (an m3.medium instance) and 2 nodes (two t2.medium instances) cluster in us-west-2a availability zone:
# kops create cluster \ --name my-cluster.k8s.local \ --zones us-west-2a \ --dns private \ --master-size=m3.medium \ --master-count=1 \ --node-size=t2.medium \ --node-count=2 \ --state s3://my-cluster-state \ --yesSome of the command options in the above example have default values: --master-size , --master-count , --node-size , and --node-count . We’ve used the default values so the end result would be the same if we hadn’t specified those options. Also note that kops will create one master node in each availability zone specified, so this option: --zones us-west-2a,us-west-2b would result in 2 master nodes, one in each of the two zones (even if --master-count was not specified in the command line).
Note that cluster creation may take a while as instances must boot, download the standard Kubernetes components and reach a “ready” state. Kops provides a command to check the state of the cluster and check it’s ready:
# kops validate cluster --state=s3://my-cluster-state Using cluster from kubectl context: my-cluster.k8s.local Validating cluster my-cluster.k8s.local INSTANCE GROUPS NAME ROLE MACHINETYPE MIN MAX SUBNETS master-us-west-2a Master m3.medium 1 1 us-west-2a nodes Node t2.medium 2 2 us-west-2a NODE STATUS NAME ROLE READY ip-172-20-32-203.us-west-2.compute.internal node True ip-172-20-36-109.us-west-2.compute.internal node True ip-172-20-61-137.us-west-2.compute.internal master True Your cluster my-cluster.k8s.local is readyIf you want to make some changes to the cluster, do so by running:
# kops edit cluster my-cluster.k8s.local # kops update cluster my-cluster.k8s.local --yesUpgrading the Cluster to a Later Kubernetes Release
Kops can upgrade an existing cluster (master and nodes) to the latest recommended release of Kubernetes without having to specify the exact version. Kops supports rolling cluster upgrades where the master and worker nodes are upgraded one by one.
1. Update Kubernetes
# kops upgrade cluster \ --name $NAME \ --state s3://my-cluster-state \ --yes2. Update the state store to match the cluster state.
# kops update cluster \ --name my-cluster.k8s.local \ --state s3://my-cluster-state \ --yes3. Perform the rolling update.
# kops rolling-update cluster \ --name my-cluster.k8s.local \ --state s3://my-cluster-state \ --yesThis will perform updates on all instances in the cluster, first master and then workers.
Delete the Cluster
To destroy an existing cluster that we used for experimenting or trials for example, we can run:
# kops delete cluster my-cluster.k8s.local \ --state=s3://my-cluster-state \ --yesFor further reading, see AWS Documentation: Manage Kubernetes Clusters on AWS Using Kops ›
Using Kubernetes EKS Managed Service
Amazon Elastic Container Service for Kubernetes (EKS) is a fully managed service that takes care of all the cluster setup and creation, ensuring multi-AZ support on all clusters and automatic replacement of unhealthy instances (master or worker nodes). It also patches and upgrades clusters to the latest recommended Kubernetes release without requiring any intervention.
While EKS provides similar levels of integration with other Amazon services as ECS, it relies on Kubernetes open orchestration model instead of an AWS specific model. This increases the portability of clusters deployed on EKS to other cloud providers. The key contention for such a migration would be the level of coupling with native AWS services, but at least the orchestration side would be easier.
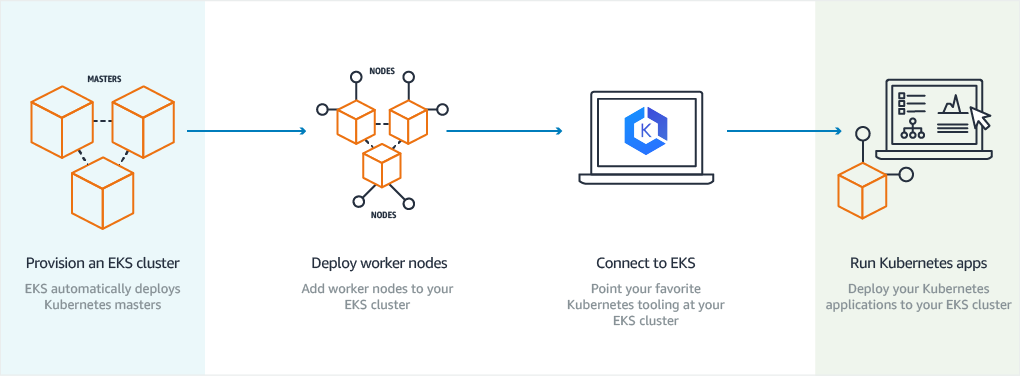
By default clusters in EKS consist of 3 masters spread across 3 different availability zones to protect against the failure of a single AWS availability zone:

Worker nodes are launched on the AWS user’s own EC2 instances, thus not shared with other tenants. In order to use tools such as kubectl , access to master instances must be set up via IAM authenticated public endpoints or through AWS PrivateLink . With AWS PrivateLink, masters appear as an elastic network interface with private IP addresses in the Amazon VPC. This allows to the masters and the EKS service directly from the Amazon VPC, without using public IP addresses or requiring the traffic to traverse the internet.
Amazon EKS also integrates tightly with other AWS services such as ELB for load balancing, or AWS CloudTrail for logging.
Standing up a new Kubernetes cluster with EKS can be done simply using the AWS Management Console. After getting access to the cluster, containerized applications can be scheduled in the new cluster in the same fashion as with any other Kubernetes installation:
For further reading, see AWS documentation: Amazon EKS ›
Launching Kubernetes on EC2 Using Rancher
Rancher is a complete container management platform that eases deployment of Kubernetes and containers. Rancher natively supports Kubernetes and allows users to control its features through a simple UI, including updates to the latest stable release. It integrates with LDAP, AD, and GitHub for authentication. Rancher also provides an application catalog with over 90 popular Docker applications .
Setting Up Rancher in AWS
Rancher (the application) runs on RancherOS, which is available as an Amazon Machine Image (AMI), and thus can be deployed on any EC2 instance.
Create RancherOS Instance on EC2
After installing and configuring AWS CLI tool, proceed to create an EC2 instance using RancherOS AMI. Check RancherOS documentation for AMI ids for each region. For example this command:
$ aws ec2 run-instances --image-id ami-12db887d --count 1 --instance-type t2.micro --key-name my-key-pair --security-groups my-sgwill create one new t2.micro EC2 instance with RancherOS on ap-south-1 AWS region. Make sure to use the correct key name and security group. Also make sure the security group enables traffic to TCP port 8080 to the new instance.
Start Rancher Server
When the new instance is ready, just connect using ssh and start the Rancher server:
$ sudo docker  run  --name rancher-server -d --restart=unless-stopped \
  -p 8080:8080 rancher/server:stable
This might take a few minutes. Once done, the UI can be accessed on port 8080 of the EC2 instance . Since by default anyone can access Rancher’s UI and API, it is recommended to set up access control.
Creating a Kubernetes cluster via Rancher in AWS
Configure Kubernetes environment template
An environment in Rancher is a logical entity for sharing deployments and resources with different sets of users. Environments are created from templates. Rancher’s application catalogue already includes templates for Kubernetes that can be selected and modified to configure, among other: disabling add-ons (Rancher installs by default: Helm , Dashboard and SkyDNS ), enabling backups , and selecting the cloud provider for managing load balancers, nodes and networking routes.
Create the Kubernetes Cluster (environment)
Adding a Kubernetes environment is just a matter of selecting the adequately configured template for our use case and inputting the cluster name. If access control is turned on, we can add members and select their membership role . Anyone added to the membership list would have access to the environment.
Add Hosts to Kubernetes Cluster
We need to add at least one host to the newly created Kubernetes environment. In this case, the hosts will be previously created AWS EC2 instances.
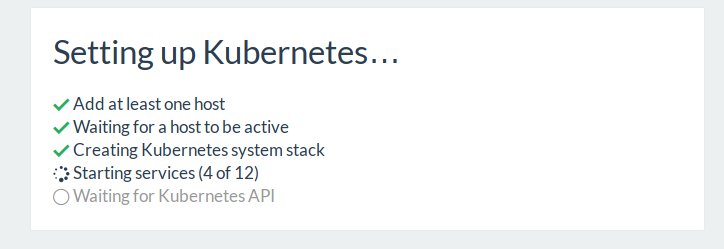
Once the first host has been added, Rancher will automatically start the deployment of the infrastructure (master) including Kubernetes services (i.e. kubelet, etcd, kube-proxy, etc). Hosts that will be used as Kubernetes nodes will require TCP ports 10250 and 10255 to be open for kubectl. Make sure to review the full list of Rancher requirements for the hosts .
It might take a few minutes for the Kubernetes cluster setup/update to complete, after adding hosts to Kubernetes environment:
Deploying Applications in the Kubernetes Cluster
Once the cluster is ready containerized applications can be deployed using either the Rancher application catalog or kubectl. kubectl needs to be configured via the Rancher UI in order for deployment information to become visible in Rancher’s dashboards.
Scheduling Kubernetes Resources on AWS Using Terraform
Terraform is an infrastructure-as-code tool used for building, changing, and versioning infrastructure safely and efficiently. It can be used to deploy containerized applications into an properly configured Kubernetes cluster running in AWS.
Terraform uses its own configuration language and by default looks for resource specifications in the same directory where the terraform commands are being executed.
Specifying Kubernetes as Provider
Terraform needs to be informed of the Kubernetes cluster configuration. For example this Terraform configuration file (extension .tf ):
provider "kubernetes" { host = "https://104.196.242.174" username = "my-user" password = "my-password" client_certificate = "${file("~/.kube/client-cert.pem")}" client_key = "${file("~/.kube/client-key.pem")}" cluster_ca_certificate = "${file("~/.kube/cluster-ca-cert.pem")}" }tells Terraform that the Kubernetes master is located at the host IP address and provides the AWS credentials and certificates to ssh to it. We can then install the Terraform plugin for Kubernetes provider by running the command:
# terraform initSpecifying and Deploying Pods and Services
Kubernetes resources like pods and services can be created using Terraform’s configuration language (which then gets translated transparently by Terraform to actual Kubernetes specifications). For example to create a single (nginx) pod and a service selecting this pod:
resource "kubernetes_pod" "nginx" { metadata { name = "nginx-example" labels { App = "nginx" } } spec { container { image = "nginx:1.7.8" name = "example" port { container_port = 80 } } } } resource "kubernetes_service" "nginx" { metadata { name = "nginx-example" } spec { selector { App = "${kubernetes_pod.nginx.metadata.0.labels.App}" } port { port = 80 target_port = 80 } type = "LoadBalancer" } }Running the terraform plan command will display the list of actions (resources to destroy, change or create) that Terraform will perform based on the above configuration:
+ kubernetes_pod.nginx + kubernetes_service.nginx Plan: 2 to add, 0 to change, 0 to destroy.Note that the whole configuration of both the pod and service are displayed, but were omitted here for brevity.
Finally, to actually deploy the pod and service, the terraform apply command must be executed. This will create resources via the API in the right order, supplying any defaults as necessary and waiting for resources to finish provisioning to the point when it can either present useful attributes or a failure (with reason) to the user.
For further reading, see Terraform documentation: Getting Started with Kubernetes Provider ›
Other Options for Deploying Kubernetes in the Cloud
Besides the Kubernetes deployment options already covered, there are other tools that can be used to deploy Kubernetes on public clouds like AWS. Each tool has its unique features and building blocks:
- Heptio – Heptio provides a solution based on CloudFormation and kubeadm to deploy Kubernetes on AWS, and supports multi-AZ. Heptio is suitable for users already familiar with CloudFormation AWS orchestration tool.
- kubeadm – The kubeadm project is focused on a solution to build a simple cluster on AWS using Terraform. It is an adequate tool for tests and proof-of-concepts only as it doesn’t support multi-AZ and other advanced features.
- OpenShift – This is a Red Hat platform-as-a-service product for container-based deployment and management of software. There is an open source version called OpenShift Origin which adds developer and operations-centric tools on top of Kubernetes to enable rapid application development, easy deployment and scaling, and long-term lifecycle maintenance for small and large teams.
- Tack – This is a terraform module that can be used to create Kubernetes clusters which run on any version of CoreOS on AWS. Supports multi-AZ deployments of worker nodes that are able to auto-scale.
- Tectonic – Tectonic enables an automated installation of Kubernetes with the goals of being secure by default, quick and easy to install clusters, highly available, modular and customizable. It also focuses on portability (runs on any operating system), and flexibility of deployment to multiple cloud providers such as AWS, Google Cloud Platform, or Microsoft Azur.
Summary
AWS is a premiere solution for running cloud native apps, but setting up Kubernetes to run on it can be complex. This is where Kubernetes deployment tools like Kops come in. Amazon itself offers alternatives to decrease the operational overhead of setting up Kubernetes: on one hand there’s the Elastic Container Service (ECS) which is a container orchestration service focused on high availability (HA) out-of-the-box but is not portable to other infrastructure providers. There’s also the Amazon Elastic Container Service for Kubernetes (EKS) which is compatible with existing Kubernetes configurations and provides HA across availability zones by default. Rancher and Terraform are tools than can help accelerate deployment of applications in Kubernetes clusters. Rancher’s forte is their application catalog that allows deploying standard and custom applications with a few clicks. Terraform can be useful for adopting a unified infrastructure configuration language across providers.
Top Kubernetes AWS Tutorials from the Community
Get Started With The Amazon Elastic Container Service For Kubernetes
Tutorial by: Bitnami
Length: Medium
Can help you learn: This guide will introduce you to Amazon EKS by provisioning a Kubernetes cluster and deploying the Bitnami WordPress Helm chart on it
Tutorial steps:
- Generate an AWS Access Key ID and Secret Access Key
- Create an AWS IAM service role
- Generate an AWS key pair for the worker nodes
- Create an AWS VPC
- Create and connect to an Amazon EKS cluster
- Add worker nodes to the Amazon EKS cluster
- Add a storage class to the Amazon EKS cluster
- Install Helm and Tiller
- Deploy the WordPress Helm chart
- Log in and start using WordPress
Manage Kubernetes Clusters on AWS Using Kops
Tutorial by: AWS
Length: Short
Can help you learn: Kubernetes lifecycle management with Kops
Tutorial Steps:
- Kubernetes and Kops overview
- DNS configuration
- Creating a Kubernetes cluster
- Upgrading a Kubernetes cluster
- Deleting a Kubernetes cluster
Deploying Kubernetes to AWS using Kops
Tutorial by: Codefresh
Length: Short
Can help you learn: Creating a Kubernetes cluster on AWS using Kops and deploying apps using Codefresh
Tutorial Steps:
- Setup environment
- Deploy Kubernetes on AWS
- Manage Kubernetes and deploy containers using Codefresh UI
Set up a production-quality Kubernetes cluster on AWS in 15 minutes
Tutorial by: Datawire Inc
Length: Short
Can help you learn: How to use Terraform to deploy a production-quality Kubernetes cluster
Tutorial steps:
- Technical design of Kubernetes on AWS
- AWS EC2 setup for Kubernetes
- Using Kops and Terraform to generate the cluster
- Reducing cost of AWS instances used in the cluster
Kubernetes on AWS Videos
In this video, Arun Gupta, open source strategist for AWS and Raffaele Di Fazio, software engineer at Zalando, show common practices for running Kubernetes on AWS and share insights from experience in operating tens of Kubernetes clusters in production on AWS.
This video covers PersistentVolumes, PersistentVolumeClaims, dynamic provisioning, StorageClasses, StatefulSets, and other technologies which help users deploy stateful applications on Kubernetes running on Amazon Web Services. It also demonstrates how to run CockroachDB, WordPress/MySQL, and GlusterFS deployed as containers using Kubernetes on AWS.
In this technical webcast, Shrinand Javadekar and Abhinav Das discuss their experiences running Kubernetes at scale on AWS, including problems they encountered, tips and best practices.
In this video, Jorge Castro walks through the process of getting the Canonical distribution of Kubernetes up and running on AWS using two tools from Canonical: Juju and conjure-up
In this webinar Chris Hein from AWS and Stuart Williams from Weaveworks explore how Weaveworks utilizes Kubernetes and AWS to achieve greater development velocity without giving up control and operational efficiencies. They also cover how Weaveworks architected a fully cloud-native application based on Kubernetes and Prometheus on AWS.
- Overview
- Kubernetes on AWS: Step by Step
- Deploying Kubernetes on AWS Using Kops
- Using Kubernetes EKS Managed Service
- Launching Kubernetes on EC2 Using Rancher
- Creating a Kubernetes cluster via Rancher in AWS
- Deploying Applications in the Kubernetes Cluster
- Scheduling Kubernetes Resources on AWS Using Terraform
- Specifying Kubernetes as Provider
- Specifying and Deploying Pods and Services
- Other Options for Deploying Kubernetes in the Cloud
- Summary
- Top Kubernetes AWS Tutorials from the Community
- Kubernetes on AWS Videos