Docker Images
What Is a Docker Image?
A Docker image is a lightweight, standalone, executable software package that includes everything needed to run an application: code, runtime, system tools, system libraries, and settings. It is a snapshot of a container, created from a set of instructions to form a complete and executable version of an application, which relies on the host OS kernel but is isolated from other applications and the system.
Docker images are built from a Dockerfile, a text document that contains all commands a user could call on the command line to assemble an image. When an image is “run” using the Docker engine, it becomes a live container. This allows for scalable and efficient distribution and deployment of applications across different environments.
In this article:
Docker Container vs. Docker Image: 3 Key Differences
It’s important to understand the difference between containers and the images upon which they are based.
1. Source
Docker images are the source of Docker containers. They serve as the static template from which containers are instantiated. Immutable and unchanged, images ensure consistency across different environments, essential for continuous integration and continuous delivery (CI/CD) pipelines.
Containers represent a running instance of a Docker image. When a Docker image is executed, it provides a writable layer on top of the image’s layers, allowing the application within the container to execute, modify files, and interact with its environment dynamically.
2. Composition
A Docker image is a collection of read-only layers, each layer representing a modification or addition from the previous layer. Multiple containers can share access to the same base image, optimizing file system usage and execution time.
Containers extend this concept by adding a writable layer on top of the base image layers. This layer is where runtime changes are stored. When a container is deleted, this writable layer is also removed, but the underlying image remains unchanged.
3. Mutability
Docker images are immutable, meaning once they are created, they do not change. This immutability ensures that images are consistent and reliable for deployment across various computing environments, playing a vital role in application development and distribution strategies.
Containers, in contrast, are mutable during their lifecycle. They can be started, stopped, moved, and deleted. However, changes made to a running container only affect that container’s writable layer, leaving the underlying image unchanged. This allows for easy experimentation and modification.
Anatomy of a Docker Image
Here’s an overview of the main elements that make up a Docker image.
Base Image
A base image is the initial layer of a Docker image, from which all other layers are built. It contains the bare minimum requirements to run an operating system, including the kernel and system libraries. Base images are typically minimal to reduce size and security vulnerabilities.
Base images are defined in the Dockerfile with the FROM instruction, providing a basis for building application-specific Docker images. They are a critical part of the lightweight and efficient nature of Dockerized applications.
Image Layers
Docker images consist of multiple layers. Each layer represents a set of changes or additions to the image, like installing software or copying files. When an image is built, Docker caches each layer. Subsequent builds reuse these cached layers if there are no changes, speeding up the build process.
Layers are immutable and stacked sequentially to form the final image. This architecture enables efficient storage and transfer, as only the layers that have changed need to be updated or sent across networks.
Container Layer
When a container is run from an image, Docker creates a thin writable container layer on top of the image’s immutable layers. This writable layer stores modifications made during the container’s life, such as adding, deleting, or modifying files.
This layer is temporary. When the container is deleted, the writable layer is also removed, ensuring the underlying image remains unchanged. This approach enables containers to be ephemeral and maintains the immutability of Docker images.
Docker Manifest
The Docker manifest describes the image’s layers, providing metadata about the image, including its layers, size, and depending on the manifest version, its content type. It ensures consistency and reliability by providing a detailed blueprint of the image.
Manifests allow Docker to pull the correct image layers for different architectures, ensuring that a Docker image can be run on various hardware setups without modification. This makes Docker images highly portable and flexible across different computing environments.
Quick Tutorial: How to Build a Docker Container Image
Set Up Docker on Your Computer
First, ensure Docker is installed on your computer. Visit the official Docker website, download the appropriate version for your operating system, and follow the installation guide. After installation, verify Docker is correctly installed by opening a terminal (or command prompt) and typing docker --version. This command should return the Docker version, indicating a successful installation.
To manage Docker as a non-root user, you might need to add your user to the Docker group. This step varies by operating system but typically involves executing a command like sudo usermod -aG docker $USER in a Linux terminal. After this, log out and back in for the changes to take effect, ensuring you can run Docker commands without using sudo.
Create a Dockerfile
A Dockerfile is a text document containing all the commands a user could call on the command line to assemble an image. Begin by creating a file named Dockerfile in your project directory, with no file extension. Open this file in a text editor and start by specifying your base image using the FROM command. For instance, FROM python:3.8-slim would be a good start for a Python-based application.
Next, use the WORKDIR instruction to set the working directory inside your container. For example, WORKDIR /app sets /app as the directory for all subsequent instructions. Then, you can use the COPY instruction to copy your application code into the container.
Finally, use the RUN command to execute any commands necessary to set up your application, such as installing dependencies.
Here’s a simple Dockerfile for a Python-based application. Before running it, ensure the files app.py and requirements.txt exist in the current folder:
# Use an official Python runtime as a parent image
FROM python:3.8-slim
# Set the working directory in the container
WORKDIR /app
# Copy the current directory contents into the container at /app
COPY . /app
# Install any needed packages specified in requirements.txt
RUN pip install --no-cache-dir -r requirements.txt
# Make port 80 available to the world outside this container
EXPOSE 80
# Define environment variable
ENV NAME World
# Run app.py when the container launches
CMD ["python", "app.py"]
Here are key points to note about this Dockerfile:
- It starts with a Python 3.8 slim image as the base layer.
- The working directory is set to /app and all files in the current directory are copied into /app in the container.
- The pip install command installs the Python dependencies defined in requirements.txt.
- The EXPOSE instruction informs Docker that the container listens on port 80.
- An environment variable NAME is set to “World”.
- Finally, the CMD instruction specifies the command to run the application, python app.py.
Build, Name, and Tag the Image
With your Dockerfile ready, it’s time to build the image. Open a terminal, navigate to your project directory where the Dockerfile is located, and run the command:
docker build -t yourname/appname:version ..
This command builds an image from the Dockerfile in the current directory, names it with your name, app name, and version tag. For example, this command:
docker build -t johndoe/myapp:1.0 .
Builds an image named myapp with the version tag 1.0 under the username johndoe.
The output should look like this:
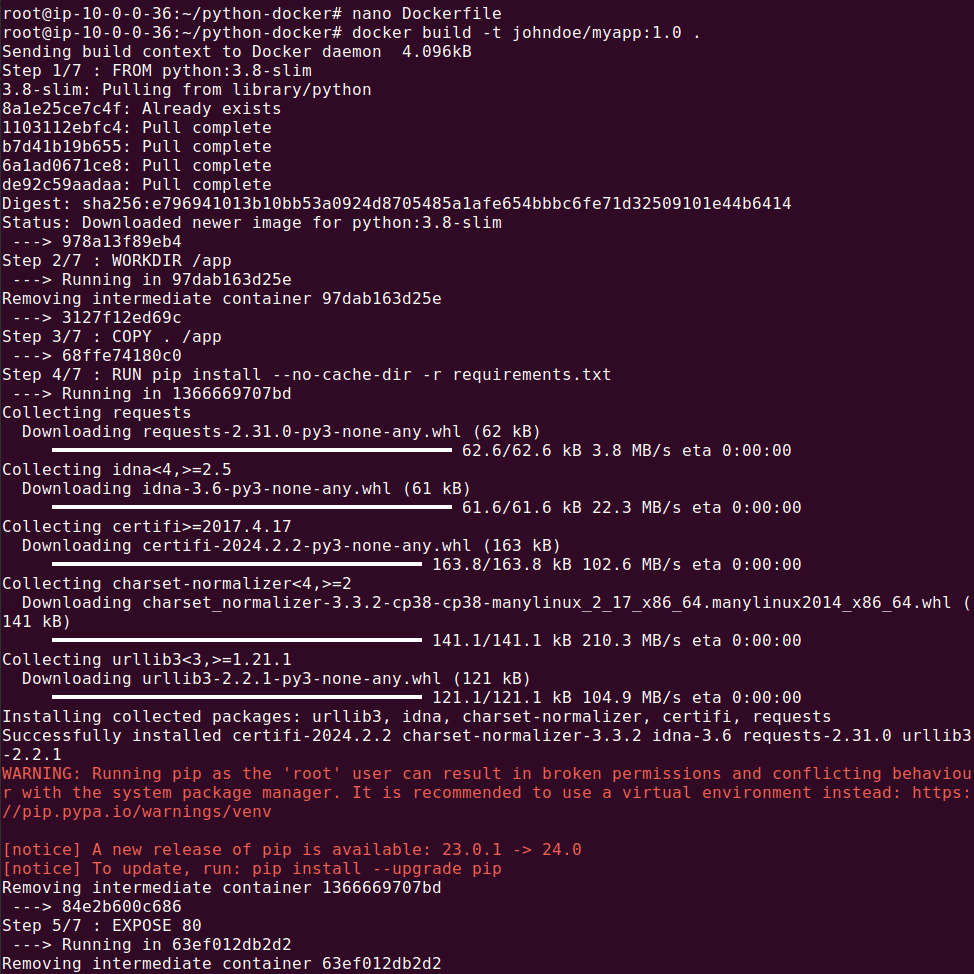
After building, check the image list by running docker images. You should see your new image listed along with other local images. The name and tag you specified during the build should identify your image, making it easy to manage and run.
Test Locally
Before pushing your image to DockerHub, it’s crucial to test it locally. To run your container image, use the command:
docker run --name test-app -d -p 4000:80 yourname/appname:version
Replace the port numbers and image name as necessary. This command starts a container named test-app in detached mode, mapping port 4000 on your host to port 80 on the container.
To check if your application is running correctly inside the container, visit http://localhost:4000 in your web browser. You should see your application running. Use docker logs test-app to view the application logs for any errors or messages, aiding in troubleshooting if the application doesn’t run as expected.
Push to DockerHub (or a Private Registry)
After local testing, the final step is to share your container image by pushing it to DockerHub, Docker’s public registry, or a private registry deployed within your organization. If you want to share your image on DockerHub, log in from your terminal using docker login and enter your DockerHub credentials.
Now, push your image using this command:
docker push yourname/appname:version
Substitute yourname, appname, and version with your DockerHub username, the name of your app, and the version tag, respectively. This command uploads your image to DockerHub, making it available for anyone to download and use. Verify the upload by checking your DockerHub repository through the web interface.
Note: On Ubuntu, you might need to install gnupg2 pass to perform the command above.
Related content: Read our guide to docker in production
Holistic Docker Security with Aqua
Aqua provides a platform that secures Cloud Native, serverless and container technologies like Docker. Aqua offers end-to-end security for applications running Docker Enterprise Edition or Community Edition, and protects you throughout the full lifecycle of your continuous delivery and DevOps pipeline: from the point where you shift left, through to runtime controls, firewall, audit, and compliance.
Continuous Image Assurance
Aqua scans images for malware, vulnerabilities, embedded secrets, configuration issues and OSS licensing. You can develop policies that outline, for example, which images can run on your Docker hosts. Aqua’s vulnerabilities database, founded on a continuously updated data stream, is aggregated from several sources and consolidated to make sure only the latest data is used, promoting accuracy and limiting false positives and negligible CVEs.
Aqua offers an open source tool, called Trivy, which lets you scan your container images for package vulnerabilities. Trivy uses the same vulnerability database as Aqua’s commercial scanner. The key difference is that Trivy runs according to the build steps created within your Dockerfile.
Runtime Security for Docker
Aqua protects Docker application at runtime, ensuring container immutability and prohibiting changes to running containers, isolating the container from the host via custom machine-learned SECCOMP profiles. It also ensures least privileges for files, executables and OS resources using a machine-learned behavioral profile, and manages network connections with a container firewall.
Aqua further enhances securing Docker as follows:
- Event logging and reporting—granular audit trails of access activity, scan Docker commands, events, and coverage, container activity, system events, and secrets activity.
- CIS certified benchmark checks—assess node configuration against Docker and K8s CIS benchmarks with scheduled reporting and testing or Aqua OSS tools.
- Global compliance templates—pre-defined compliance policies meet security standards such as HIPPA, CIS, PCI, and NIST.
- Full user accountability—uses granular user accountability and monitored super-user permissions.
- “Thin OS” host compliance—monitor and scan host for malware, vulnerabilities, login activity, and to identify scan images kept on hosts.
- Compliance enforcement controls—only images and workloads that pass compliance checks can run in your environment.
Container Firewall for Docker
Aqua’s container firewall lets you visualize network connections, develop rules based on application services, and map legitimate connections automatically. Only whitelisted connections will be allowed, both within a Swarm or Kubernetes cluster, and also between clusters.
Secrets Management
Store your credentials as secrets, don’t leave them in your source code. Aqua securely transfers secrets to containers at runtime, encrypted at rest and in transit, and places them in memory with no persistence on disk, so they are only visible to the relevant container. Integrate Aqua’s solution with your current enterprise vault, including CyberArk, Hashicorp, AWS KMS or Azure Vault. You can revoke, update, and rotate secrets without restarting containers.
- What Is a Docker Image?
- Docker Container vs. Docker Image: 3 Key Differences
- 1. Source
- 2. Composition
- 3. Mutability
- Anatomy of a Docker Image
- Base Image
- Image Layers
- Container Layer
- Docker Manifest
- Quick Tutorial: How to Build a Docker Container Image
- Set Up Docker on Your Computer
- Create a Dockerfile
- Build, Name, and Tag the Image
- Test Locally
- Push to DockerHub (or a Private Registry)
- Holistic Docker Security with Aqua