Docker Container

The raw deal on Docker: architecture, concepts, basics, industry opinions, all the way to ninja topics like Docker Swarm and Docker Networking.

December 14, 2020

Everything you need to know about Docker Containers – from basic to advanced:

What is Docker?

You probably heard of the statement ‘Write once, run anywhere, a catchphrase that SUN Microsystems came out with to capture Java’s ubiquitous nature. This is a great paradigm except that, if you have a java application, for example, in order to run it anywhere you need platform-specific implementations of the Java Virtual Machine. On the other end of the ‘run anywhere’ spectrum, we have Virtual Machines. This approach, while versatile, comes at the cost of large image sizes, high IO overhead, and maintenance costs.
What if there is something that is light in terms of storage, abstracted enough to be run anywhere, and independent of the language used for development?

This is where Docker comes in! Docker is a technology that allows you to incorporate and store your code and its dependencies into a neat little package – an image. This image can then be used to spawn an instance of your application – a container. The fundamental difference between containers and Virtual Machines is that containers don’t contain a hardware hypervisor.

This approach takes care of several issues:

  • No platform specific, IDE, or programming language restrictions.
  • Small image sizes, making it easier to ship and store.
  • No compatibility issues relating to the dependencies/versions/setup.
  • Quick and easy application instance deployment.
  • Applications and their resources are isolated, leading to better modularity and security.

Docker Architecture

To allow for an application to be self-contained the Docker approach moves up the abstraction of resources from the hardware level to the Operating System level.

To further understand Docker, let us look at its architecture. It uses a client-server model and comprises of the following components:

  • Docker daemon: The daemon is responsible for all container related actions and receives commands via the CLI or the REST API.
  • Docker Client: A Docker client is how users interact with Docker. The Docker client can reside on the same host as the daemon or a remote host.
  • Docker Objects: Objects are used to assemble an application. Apart from networks, volumes, services, and other objects the two main requisite objects are:
  • Images: The read-only template used to build containers. Images are used to store and ship applications.
  • Containers: Containers are encapsulated environments in which applications are run. A container is defined by the image and configuration options. At a lower level, you have containerd, which is a core container runtime that initiates, and supervises container performance.
  • Docker Registries: Registries are locations from where we store and download (or “pull”) images.
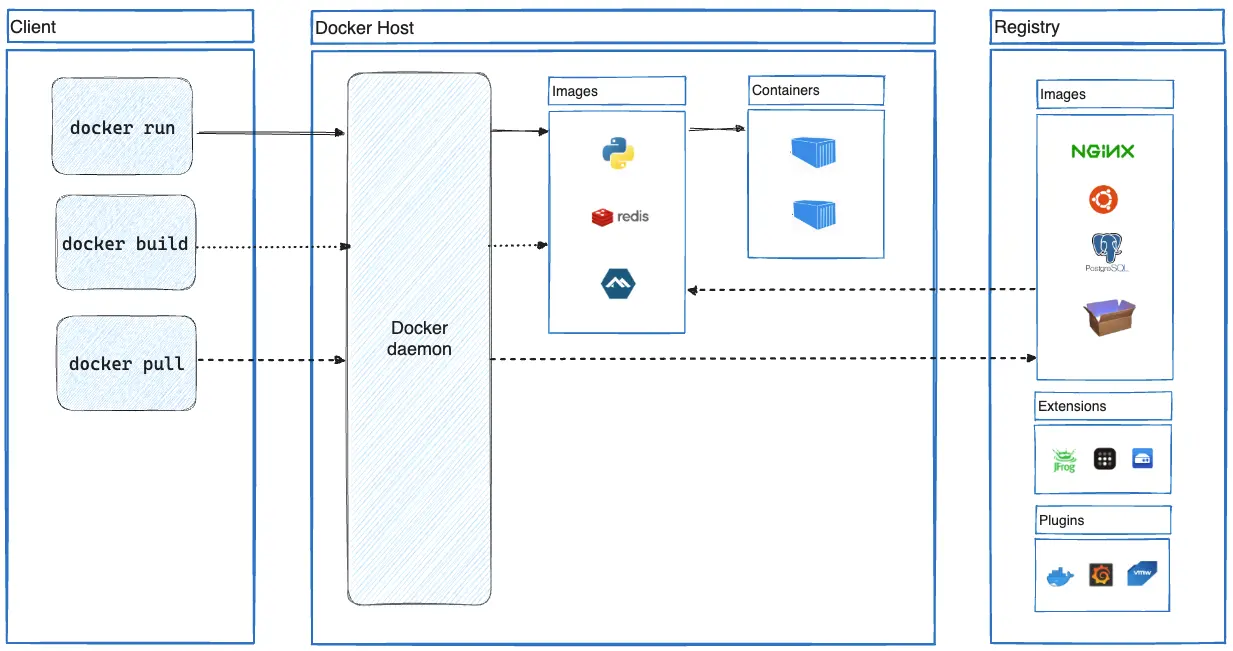
Basic Docker Operations

  • Docker Image Repositories — A Docker Image repository is a place where Docker Images are actually stored, compared to the image registry which is a collection of pointers to this images. This page gathers resources about public repositories like the Docker hub and private repositories and how to set up and manage Docker repositories.
  • Working With Dockerfiles — The Dockerfile is essentially the build instructions to build the Docker image. The advantage of a Dockerfile over just storing the binary image is that the automatic builds will ensure you have the latest version available. This page gathers resources about working with Dockerfiles including best practices, Dockerfile commands, how to create Docker images with a Dockerfile and more.
  • Running Docker Containers — All docker containers run one main process. After that process is complete the container stops running. This page gathers resources about how to run docker containers on different operating systems, including useful docker commands.
  • Working With Docker Hub — Docker Hub is a cloud-based repository in which Docker users and partners create, test, store and distribute container images. Through Docker Hub, a user can access public, open source image repositories, as well as use a space to create their own private repositories, automated build functions, and work groups. This page gathers resources about Docker Hub and how to push and pull container images to and from Docker Hub.
  • Docker Container Management — The true power of Docker container technology lies in its ability to perform complex tasks with minimal resources. If not managed properly they will bloat, bogging down the environment and reducing the capabilities they were designed to deliver. This page gathers resources about how to effectively manage Docker, how to pick the right management tool including a list of recomended tools.
  • Storing Data Within Containers — It is possible to store data within the writable layer of a container. Docker offers three different ways to mount data into a container from the Docker host: volumes, bind mounts, or tmpfs volumes. This page gathers resources about various to store data with containers, the downsides like the persistent storage and information on how to manage data in Docker.
  • Docker Compliance — While Docker Containers have fundamentally accelerated application development, organizations using them still must adhere to the same set of external regulations, including NIST, PCI and HIPAA.  They also must meet their internal policies for best practices and configurations. This page gathers resources about Docker compliance, policies, and its challenges.

Docker Images

What is a Docker Image?

Docker image is a snapshot, or template, from which new containers can be started. It’s a representation of a filesystem plus libraries for a given OS. A new image can be created by executing a set of commands contained in a Dockerfile (it’s also possible but not recommended to take a snapshot from a running container). For example, this  Dockerfile  would take a base Ubuntu 16.06 image and install mongoDB, resulting in a new image:

FROM ubuntu:16.04
RUN apt-get install -y mongodb-10gen

From a physical perspective, an image is composed of a set of read-only layers. Image layers function as follows:

  • Each image layer is the outcome of one command in the image’s Dockerfile—an image is then a compressed (tar) file containing the series of layers.
  • Each additional image layer only includes the set of differences from the previous layer (try running  docker history  for a given image to list all its layers and what created them).

For further reading, see Docker Documentation: About images, containers, and storage drivers ›

Running Images as Containers

Images and containers are not the same—a container is a running instance of an image. A single image can be used to start any number of containers. Images are read-only, while containers can be modified, Also, changes to a container will be lost once it gets removed, unless changes are committed into a new image.

Follow these steps to run an image as container:

  • First, note that you can run containers specifying either the image name or image ID (reference).
  • Run the  docker images  command to view the images you have pulled locally or, alternatively,  explore the Docker Hub  repositories for the image you want to run the container from.

Once you know the name or ID of the image, you can start a docker container with the   docker run   command. For example, to download the Ubuntu 16.04 image (if not available locally yet), start a container and run a bash shell:

docker run -it ubuntu:16.04 /bin/bash

For further reading, see Docker Documentation:  Docker Run Reference ›

Common Operations

Some common operations you’ll need with Docker images include:

  • Build a new image from a Dockerfile: The command for building an image from a Dockerfile is  docker build , where you specify the location of the Dockerfile (it could be the current directory). You can (optionally) apply one or more tags to the resulting image using parameters. Use the -t option.
  • List all local images: Use the docker images command to list all local images. The output includes image ID, repository, tags, and creation date.
  • Tagging an existing image: You assign tags to images for clarification, so users know the version of an image they are pulling from a repository. The command to tag an image is docker tag and you need to provide the image ID and your chosen tag (including the repository). For example:
docker tag 0e5574283393 username/my_repo:1.0
  • Pulling a new image from a Docker Registry: To pull an image from a registry, use  docker pull  and specify the repository name. By default, the latest version of the image is retrieved from the Docker Hub registry, but this behaviour can be overridden by specifying a different version and/or registry in the pull command. For example, to pull version 2.0 of my_repo from a private registry running on localhost port 5000, run:
docker pull localhost:5000/my_repo:2.0
  • Pushing a local image to the Docker registry: You can push an image to Docker Hub or another registry to make it available for other users by running the docker push command. For example, to push the (latest) local version of my_repo to Docker Hub, make sure you’re logged in first by running docker login, then run:
docker push username/my_repo
  • Searching for images: You can search the Docker Hub for images relating to specific terms using docker search.  You can specify filters to the search, for example only list “official” repositories.

Best Practices for Building Images

The following best practices are recommended when you build images by writing Dockerfiles:

  • Containers should be ephemeral in the sense that you can stop or delete a container at any moment and replace it with a new container from the Dockerfile with minimal set-up and configuration.  
  • Use a .dockerignore file to reduce image size and reduce build time by excluding files from the build context that are unnecessary for the build. The build context is the full recursive contents of the directory where the Dockerfile was when the image was built.
  • Reduce image file sizes (and attack surface) while keeping Dockerfiles readable by applying either a builder pattern or a multi-stage build  (available only in Docker 17.05 or higher).
  • With a builder pattern, you maintain two Dockerfiles – one to build an application inside the image and a second Dockerfile that includes only the resulting application binaries from the first image to generate a second, streamlined image that is production ready. This pattern requires a custom script in order to automatically apply the transformation from the “development” image to the “production” image (for an example, see the Docker documentation: Before Multi-Stage Builds ).
  • multi-stage build allows you to use multiple FROM statements in a single Dockerfile and selectively copy artifacts from one stage to another, leaving behind everything you don’t want in the final image. You can, therefore, reduce image file sizes without the hassle of maintaining separate Dockerfiles and custom scripts when using the builder pattern.
  • Don’t install unnecessary packages when building images.
  • Use multi-line commands instead of multiple RUN commands for faster builds when possible (for example, when installing a list of packages).
  • Sort multi-line lists of packages into alphanumerical order to easily identify duplicates and make it easier to update and review the list.
  • Enable content trust when operating with a remote Docker registry so that you can only push, pull, run, or build trusted images which have been digitally signed to verify their integrity. When you use Docker with content trust, commands only operate on tagged images that have been digitally signed. Less trustworthy unsigned image tags are invisible when you enable content trust (off by default). To enable it, set the DOCKER_CONTENT_TRUST environment variable to 1. For further information see the Docker documentation:  Content trust in Docker.

For further reading, see Docker Documentation:  Best Practices For Writing Dockerfiles ›

Docker Administration

  • Docker Configuration — After installing Docker and starting Docker, the dockerd daemon runs with its default configuration. This page gathers resources on how to customize the configuration, Docker registry configuration, start the daemon manually, and troubleshoot and debug the daemon if run into issues.
  • Collecting Docker Metrics — In order to get as much efficiency out of Docker as possible, we need to track Docker metrics. Monitoring metrics is also important for troubleshooting problems. This page gathers resources on how to collect Docker metrics with tools like Prometheus, Grafana, InfluxDB and more.
  • Starting and Restarting Docker Containers Automatically — Docker provides restart policies to control whether your containers start automatically when they exit, or when Docker restarts. Restart policies ensure that linked containers are started in the correct order. This page gathers resources about how to automatically start Docker container on boot or after server crash.
  • Managing Container Resources — Resource management for Docker containers is a huge requirement for production users. It is necessary for running multiple containers on a single host in an efficient way and to ensure that one container does not starve the others in terms of cpu, memory, io, or networking. This page gathers resources about how to improve Docker performance by managing it’s resources.
  • Controlling Docker With systemd — Systemd provides a standard process for controlling programs and processes on Linux hosts. One of the nice things about systemd is that it is a single command that can be used to manage almost all aspects of a process. This page gathers resources about how to use systemd with Docker daemon service.
  • Docker CLI Commands — There are a large number of Docker client CLI commands, which provide information relating to various Docker objects on a given Docker host or Docker Swarm cluster. Generally, this output is provided in a tabular format. This page gathers resources about how the Docker CLI Work, CLI Tips and Tricks and basic Docker CLI commands.
  • Docker Logging — Logs tell the full story of what is happening, or what happened at every layer of the stack. Whether it’s the application layer, the networking layer, the infrastructure layer, or storage, logs have all the answers. This page gathers resources about working with Docker logs, how to manage and implement Docker logs and more.
  • Troubleshooting Docker Engine — Docker makes everything easier. But even with the easiest platforms, sometimes you run into problems. This page gathers resources about  how to diagnose and troubleshoot problems, send logs, and communicate with the Docker Engine.
  • Docker Orchestration – Tools and Options — To get the full benefit of Docker container, you need software to move containers around in response to auto-scaling events, a failure of the backing host, and deployment updates. This is container orchestration. This page gathers resources about Docker orchestration tools, fundamentals and best practices.

Docker Alternatives

While Docker is the most widely used and recognized container technology, there are other technologies that either preceded Docker, emerged side-by-side with Docker, or have been introduced more recently. All follow a similar concept of images and containers, but have some technical difference worth understanding:

rkt (pronounced ‘rocket’) from the Linux distributor, CoreOS

CoreOS released rkt in 2014, with a production-ready release in February 2016, as a more secure alternative to Docker. It is the most worthy alternative to Docker as it has the most real-world adoption, has a fairly big open source community, and is part of the CNCF. It was first released in February 2016.

Additional reading: Product pageGitHub page

LXD (pronounced “lexdi”) from Canonical Ltd., the company behind Ubuntu

Canonical launched its own Docker alternative, LXD, in November 2014, with the focus of offering full system containers. Basically, LXD acts like a container hypervisor and is more Operating System centric rather than Application Centric.

Additional reading: Product pageGitHub page

Linux VServer

Like OpenVZ, Linux VServer provides operating system-level virtualization capabilities via a patched Linux kernel. The first stable version was released in 2008.

Additional reading: WebsiteGitHub page

Windows Containers

Microsoft has also introduced the Windows Containers feature with the release of the Windows Server 2016, in September 2016. There are currently two Windows Container types:

  • Windows Containers: Similar to Docker containers Windows containers use namespaces and resource limits to isolate processes from one another. These containers share a common kernel unlike a virtual machine which has its own kernel.
  • Hyper-V Containers: Hyper-V containers are fully isolated highly optimized virtual machines that contain a copy of the windows Kernel. Unlike Docker containers that isolate processes and share the same kernel, Hyper-V containers each have their own kernel.

See the Microsoft documentation ›

How Do They Differ from Docker?

Let us take a quick look at how each of these alternatives differs from Docker:

RktLXDOpenVZLinuxVServerWindows Containers
Compared to DockerFocuses on compatibility, hence it supports multiple container formats, including Docker images and its own format. Like Docker, it is optimized for application containers, not full-system containers and has fewer third-party integrations available.Emulates the experience of operating Virtual Machines but in terms of containers and does so without the overhead of emulating hardware resources. While the LXD daemon requires a Linux kernel it can be configured for access by a Windows or macOS client.An extension of the Linux kernel, which provides tools for virtualization to the user. It uses Virtual Environments to host Guest systems, which means it uses containers for entire operating systems, not individual applications and processes.Uses a patched kernel to provide operating system-level virtualization features. Each of the Virtual Private Servers is run as an isolated process on the same host system and there is a high efficiency as no emulation is required. However, it is archaic in terms of releases, as there have been none since 2007.The Docker Engine for Windows Server 2016 directly accesses the windows kernel. Hence native Docker containers cannot be run on Windows Containers. Instead, a different container format, WSC (Windows Server Container), is to be used.
Use CasesPublic cloud portability, Stateful app migration, and Rapid Deployment.Bare-metal hardware access for VPS, multiple Linux distributions on the same host.CI/CD and DevOps, Containers and big data, Hosting Isolated Set of User Applications, Server consolidation.Multiple VPS Hosting and Administration, and Legacy support.
AdoptionModerate.Low.Low.Low – Moderate (Mostly Legacy Hosting).
Used ByCA Technologies, Verizon, Viacom, Salesforce.com , DigitalOcean, BlaBlaCar, Xoom.Walmart PayPal, Box.FastVPS, Parallels, Pixar Animation Studios, Yandex.DreamHost, Amoebasoft, OpenHosting Inc., Lycos, France, Mosaix Communications, Inc.

Docker vs. Kubernetes

Comparing Mindshare

Mindshare MetricKubernetesDocker Swarm
Google Monthly Searches165,00033,100
Pages Indexed by Google Past Year1,190,000135,000
News Stories Past Year36,0003,610
Github Stars28,9884,863
Github Commits58,0293,493
These stats are correct as of November, 2017, and will be updated every few months

Technical Comparisons from the Community

Mesosphere: Docker Engine vs. Kubernetes vs. Mesos

Undated
Opinion by:Amr Abdelrazik, Director, Product Marketing, Mesosphere

What is covered:
• Detailed architecture overview
• What each solution was intended to solve
• Recommends the right solution for different use cases
Insight:
Each technology was designed for a different purpose. Docker provided a standard file format for encapsulating applications. Kubernetes helps orchestrate containers at large scale. Mesos is actually not an orchestrator, it is a cluster management platform that can run any workloads, including containers (using the Marathon project). Mesos is agnostic to infrastructure giving it higher portability. 
Bottom line:
If you are a developer looking for way to build and package applications, Docker is the best solution. For a DevOps team wanting to build a system dedicated exclusively to Docker containers, Kubernetes is the best fit. For organizations running multiple mission critical workloads including Docker containers, legacy applications (e.g., Java), and distributed data services (e.g., Spark, Kafka, Cassandra, Elastic), Mesos is the best fit. 
Grain of salt:
Mesosphere is the commercial supporter of the Mesos project.

Read the full article
Platform9: Kubernetes vs. Docker Swarm

Date: June 22, 2017
Opinion by: Akshai Parthasarathy, Technical Product Marketing Manager, Platform9

What is covered:
Detailed architecture overview of both systems
Feature comparison: Application definition, scalability constructs, high availability, load balancing, auto-scaling for the application, rolling upgrades and rollback, health checks, storage, networking, service discovery, performance and scalability.
Bottom line:
Kubernetes has over 80% of mindshare for news articles, Github popularity, and web searches, and is the default choice for users. However, there is consensus that Kubernetes is more complex to deploy and manage. The Kubernetes community has tried to mitigate this drawback by offering a variety of deployment options, including Minikube and kubeadm.
Grain of salt:
Platform9 offers a managed Kubernetes service.

Read the full article

Business Commentaries

Forbes: Docker and Kubernetes, Friends or Foes?

Date: April 28, 2017
Opinion by: Mike Kavis, VP/Principal Architect for Cloud Technology Partners

The gist:
While industry commentators talk about a battle between Docker and Kubernetes, in reality Docker is a wider platform and not just about containers. The orchestration tier is only one part of Docker’s offering, and there is still a very big need for the platform, even if the orchestration layer were replaced with Kubernetes.
Bottom line:
Kubernetes is an enabler for Docker, not a competitor. Docker’s main interest is to have more Docker engines running, which will increase their support revenues. Support for Kubernetes and greater uptake of Kubernetes should only help with this goal.

Read the full article
The Register: Kubernetes has won. Docker Enterprise Edition will support rival container-wrangling tech

Date: October 17, 2017
Opinion by: Thomas Claburn, Journalist, former editor at InformationWeek

The gist:
Both Docker and Mesos realized that mindshare behind Kubernetes is just too big and made a pragmatic decision to support Kubernetes, while not giving up on their native solutions, Swarm and Marathon.
Bottom line:
Docker Swarm and Mesos/Marathon are good solutions, but analysts believe Kubernetes will eventually take over, and there is no room in the market for three orchestration platforms. 

Read the full article

Docker Security

  • Docker Repository Security and Certificates — Docker runs via a non-networked Unix socket and TLS must be enabled in order to have the Docker client and the daemon communicate securely over HTTPS. This page gathers resources about how to ensure the traffic between the Docker registry and the Docker daemon is encrypted and a properly authenticated using certificate-based client-server authentication.
  • Docker Trusted Image Registry — Docker Trusted Registry (DTR) is the enterprise-grade image storage solution from Docker. It is installed behind a firewall so that Docker images can be securely stored and managed. This page gathers resources about the benefits of Docker trusted registry and how to work with it.
  • Docker AppArmor Security Profiles — AppArmor (Application Armor) is a Linux security module that protects an operating system and its applications from security threats. To use it, a system administrator associates an AppArmor security profile with each program. Docker expects to find an AppArmor policy loaded and enforced. This page gathers resources about Docker AppArmor security profiles and how to use them to enhance container security.
  • Isolating Docker Containers — Docker container technology increases the default security by creating isolation layers between applications and between the application and host and reducing the host surface area which protects both the host and the co-located containers by restricting access to the host.
  • Docker CIS Benchmark — The Center for Internet Security (CIS) Docker Benchmark is a reference document that can be used by system administrators, security and audit professionals and other IT roles to establish a secure configuration baseline for Docker containers. This page gather resources about CIS Docker benchmark and how to implement it.

Docker Swarm

What is Docker Swarm?

Docker swarm mode allows you to manage a cluster of Docker Engines, natively within the Docker platform. You can use the Docker CLI to create a swarm, deploy application services to a swarm, and manage swarm behavior.

Docker will shortly support Kubernetes Guide as well as Docker Swarm, and Docker users will be able to use either Kubernetes or Swarm to orchestrate their container workloads.

Swarm can help developers and IT administrators:

  • Coordinate between containers and allocate tasks to groups of containers
  • Perform health checks and manage lifecycle of individual containers
  • Provide redundancy and failover in case nodes experience failure
  • Scale the number of containers up and down depending on load
  • Perform rolling updates of software across multiple containers

Docker Swarm Concepts

  • Swarmkit – a separate project which implements Docker’s orchestration layer and is used directly within Docker to implement Docker swarm mode.
  • Swarm – a swarm consists of multiple Docker hosts which run in swarm mode and act as managers and workers.
  • Task – the swarm manager distributes a specific number of tasks among the nodes, based on the service scale you specify. A task carries a Docker container and the commands to run inside the container. Once a task is assigned to a node, it cannot move to another node. It can only run on the assigned node or fail.
  • Service – a service is the definition of the tasks to execute on the manager or worker nodes. When you create a service, you specify which container image to use and which commands to execute inside running containers. A key difference between services and standalone containers is that you can modify a service’s configuration, including the networks and volumes it is connected to, without manually restarting the service.
  • Nodes – a swarm node is an individual Docker Engine participating in the swarm. You can run one or more nodes on a single physical computer or cloud server, but production swarm deployments typically include Docker nodes distributed across multiple machines.
  • Manager nodes – dispatches units of work called tasks to worker nodes. Manager nodes also perform orchestration and cluster management functions.
  • Leader node – manager nodes elect a single leader to conduct orchestration tasks, using the Raft consensus algorithm.
  • Worker nodes – receive and execute tasks dispatched from manager nodes. By default manager nodes also run services as worker nodes. An agent runs on each worker node and reports on the tasks assigned to it to its manager node.
  • Load balancing – the swarm manager uses ingress load balancing to expose the services running on the Docker swarm, enabling external access. The swarm manager assigns a configurable PublishedPort for the service. External components, such as cloud load balancers, can access the service on the PublishedPort of any node in the cluster, whether or not the node is currently running the task for the service. All nodes in the swarm route ingress connections to a running task instance. The swarm manager uses internal load balancing to distribute requests among services within the cluster based upon the DNS name of the service.

Running Docker Swarm

  • The Docker engine runs with swarm mode disabled by default. To run Docker container in swarm mode, you can either create a new swarm or have the container join an existing swarm. 
  • To create a swarm, run the docker swarm init command, which creates a single-node swarm on the current Docker engine. The current node becomes the manager node for the newly created swarm.
  • The output for the docker swarm init command tells you which command you need to run on other Docker containers to allow them to join your swarm as worker nodes. 
  • Other nodes can access the SwarmKit API using the manager node’s advertised IP address. SwarmKit is a toolkit for orchestrating distributed systems, including node discovery, task scheduling, and more. 
  • Each node requires a secret token to join a swarm. The token for worker nodes is different from the token for manager nodes, and the token is only used at the time a container joins the swarm. 
  • Manager tokens should be strongly protected, because any access to the manager token grants control over an entire swarm. 

For more details, see the Swarm documentation: Run Docker in Swarm mode ›

Common Docker Swarm Operations

In this section you will learn:

Creating and Joining a Swarm  

The Docker engine runs with swarm mode disabled by default. To run Docker in swarm mode, you can either create a new swarm or have the container join an existing swarm. 

To create a swarm – run the docker swarm init command, which creates a single-node swarm on the current Docker engine. The current node becomes the manager node for the newly created swarm.

To join a swarm – the output for the docker swarm init command tells you which command you need to run on other Docker containers to allow them to join your swarm as worker nodes, including a “join token”. For example, to add a worker to this swarm, run the following command:

docker swarm join \
--token SWMTKN-1-49nj1cmql0jkz5s954yi3oex3nedyz0fb0xx14ie39trti4wxv-8vxv8rssmk743ojnwacrr2e7c \
192.168.99.100:2377

There is a different join token for worker nodes and manager nodes. The token is only used at the time a container joins the swarm. Manager tokens should be strongly protected, because any access to the manager token grants control over an entire swarm. 

You can run swarm join-token --rotate at any time to invalidate the older token and generate a new one, for security purposes.

Accessing management functionality – swarm nodes can access the SwarmKit API (providing operations like node discovery and task scheduling) and overlay networking, using an “advertise address” you specify for the manager node. If you don’t specify an address, and there is a single IP for the system, Docker listens by default on port 2377. SwarmKit is a toolkit for orchestrating distributed systems, including node discovery and task scheduling. 

For more details, see the Swarm documentation: Create a Swarm ›

Manage Nodes in a Swarm 

To get visibility into the nodes on your swarm, list them using the docker node ls command on a manager node. 

The listed nodes display an availability status that identifies whether the scheduler can assign tasks to the node. 

  • manager status value identifies whether the node participates in swarm management.
  • A blank value indicates that the node is a worker node. 
  • Leader value identifies the primary manager node that makes all swarm management and orchestration decisions for the swarm. 
  • Reachable value identifies nodes that are manager nodes and are candidates to become leader nodes in the event that a leader node is unavailable.
  • An Unavailable value signifies a manager node that cannot communicate with other managers. Such nodes should be replaced by promoting worker nodes or adding a new manager node. 

For more details, see the Swarm Documentation: Manage Nodes in a Swarm ›

Docker Networking

What is Docker Networking?

For Docker containers to communicate with each other and the outside world via the host machine, there has to be a layer of networking involved. Docker supports different types of networks, each fit for certain use cases.

For example, building an application which runs on a single Docker container will have a different network setup as compared to a web application with a cluster with database, application and load balancers which span multiple containers that need to communicate with each other. Additionally, clients from the outside world will need to access the web application container.

See Docker Documentation: Network containers ›

Docker Default Networking (docker0)

When Docker is installed, a default bridge network named  docker0 is created. Each new Docker container is automatically attached to this network, unless a custom network is specified.

Besides  docker0  , two other networks get created automatically by Docker:  host  (no isolation between host and containers on this network, to the outside world they are on the same network) and  none   (attached containers run on container-specific network stack).

See Docker Documentation: Default networks ›

Network Types

Docker comes with network drivers geared towards different use cases. The most common network types being: bridge, overlay, and macvlan.

Bridge Networks

Bridge networking is the most common network type. It is limited to containers within a single host running the Docker engine. Bridge networks are easy to create, manage and troubleshoot.

For the containers on bridge network to communicate or be reachable from the outside world, port mapping needs to be configured. As an example, consider you can have a Docker container running a web service on port  80  . Because this container is attached to the bridge network on a private subnet, a port on the host system like  8000  needs to be mapped to port  80 on the container for outside traffic to reach the web service.

To create a bridge network named  my-bridge-net  , pass the argument  bridge  to the  -d  (driver) parameter as shown below:

$ docker network create -d bridge my-bridge-net

See Docker Documentation: Bridge networks ›

Overlay Networks

An overlay network uses software virtualization to create additional layers of network abstraction running on top of a physical network. In Docker, an overlay network driver is used for multi-host network communication. This driver utilizes Virtual Extensible LAN (VXLAN) technology which provide portability between cloud, on-premise and virtual environments. VXLAN solves common portability limitations by extending layer 2 subnets across layer 3 network boundaries, hence containers can run on foreign IP subnets.

To create an overlay network named my-overlay-net, you’ll also need the --subnet parameter to specify the network block that Docker will use to assign IP addresses to the containers:

$ docker network create -d overlay --subnet=192.168.10.0/24 my-overlay-net

See Docker Documentation: An overlay network without swarm mode ›

Macvlan Networks

The macvlan driver is used to connect Docker containers directly to the host network interfaces through layer 2 segmentation. No use of port mapping or network address translation (NAT) is needed and containers can be assigned a public IP address which is accessible from the outside world. Latency in macvlan networks is low since packets are routed directly from Docker host network interface controller (NIC) to the containers.

Note that macvlan has to be configured per host, and has support for physical NIC, sub-interface, network bonded interfaces and even teamed interfaces. Traffic is explicitly filtered by the host kernel modules for isolation and security. To create a macvlan network named macvlan-net, you’ll need to provide a --gateway parameter to specify the IP address of the gateway for the subnet, and a -o parameter to set driver specific options. In this example, the parent interface is set to eth0 interface on the host:

$ docker network create -d macvlan \
  --subnet=192.168.40.0/24 \
  --gateway=192.168.40.1 \
  -o parent=eth0 my-macvlan-net

See Docker Documentation: Get started with Macvlan network driver ›

How Containers Communicate with Each Other

Different networks provide different communication patterns (for example by IP address only, or by container name) between containers depending on network type and whether it’s a Docker default or a user-defined network.

Container discovery on docker0 network (DNS resolution)

Docker will assign a name and hostname to each container created on the default docker0 network, unless a different name/hostname is specified by the user. Docker then keeps a mapping of each name/hostname against the container’s IP address. This mapping allows pinging each container by name as opposed to IP address.

Furthermore, consider the following example which starts a Docker container with a custom name, hostname and DNS server:

$ docker run --name test-container -it \
--hostname=test-con.example.com \
--dns=8.8.8.8 \
ubuntu /bin/bash

In this example, processes running inside test-container, when confronted with a hostname not in /etc/hosts, will connect to address 8.8.8.8 on port 53 expecting a DNS service.

See Docker Documentation: Embedded DNS server in user-defined networks ›

Directly linking containers

It is possible to directly link one container to another using the --link option when starting a container. This allow containers to discover each other and securely transfer information about one container to another container. However, Docker has deprecated this feature and recommends creating user-defined networks instead.

As an example, imagine you have a mydb container running a database service. We can then create an application container named myweb and directly link it to mydb:

$ docker run --name myweb --link mydb:mydb -d -P myapp python app.py

For further reading see Docker Documentation: Legacy container links ›

How Containers Communicate with the Outside World

There are different ways in which Docker containers can communicate with the outside world, as detailed below.

Exposing Ports and Forwarding Traffic

In most cases, Docker networks use subnets without access from the outside world. To allow requests from the Internet to reach the container, you’ll need to map container ports to ports on the container’s host. For example, a request to hostname:8000 will be forwarded to whatever service is running inside the container on port 80, if a mapping from host port 8000 to container port 80 to was previously defined.

See Docker Documentation: Exposing and publishing ports ›

Containers Connected to Multiple Networks

Fine-grained network policies for connectivity and isolation can be achieved by joining containers to multiple networks. By default each container will be attached to a single network. More networks can be attached to a container by creating it first with docker create (instead of docker run) and then running the command docker network connect. For example:

$ docker network create net1 # creates bridge network name net1
$ docker network create net2 # creates bridge network name net2
$ docker create -it --net net1 --name cont1 busybox sh # creates container named cont1 attached to network net1
$ docker network connect net2 cont1 # further attaches container cont1 to network net2

The container is now connected to two distinct networks simultaneously.

See Docker Documentation: User-defined networks ›

How IPv6 Works on Docker

By default, Docker configures the container networks for IPv4 only. To enable IPv4/IPv6 dual stack the --ipv6 flag needs to be applied when starting the Docker daemon. Then the docker0 bridge will get an IPv6 link-local address fe80::1. To assign globally routable IPv6 addresses to your containers, use the flag --fixed-cidr-v6 followed by ipv6 address.

See Docker Documentation: IPv6 with Docker ›

Common Operations

Some common operations with Docker networking include:

  • Inspect a network: To see a specific network’s configuration details like subnet information, network name, IPAM driver, network ID, network driver, or connected containers, use the docker network inspect command.
  • List all networks: Run docker network ls to display all networks (along with their type and scope) present on the current host.
  • Create a new network: To create a new network, use the docker network create command and specify if it’s of type bridge (default), overlay or macvlan.
  • Run or connect a container to a specific network: Note first of all, the network must exist already on the host. Either specify the network at container creation/startup time (docker create or docker run) with the --net option; or attach an existing container by using the docker network connect command. For example:
docker network connect my-network my-container
  • Disconnect a container from a network: The container must be running to disconnect it from the network using the docker network disconnect command.
  • Remove an existing network: A network can only be removed using the command docker network rm if there are no containers attached to it. When a network is removed, the associated bridge will be removed as well.

Docker Networking with Multiple Hosts

When working with multi-host, there is a need to use higher-level Docker orchestration tools to ease management of networking between a cluster of machines. Popular orchestration tools today include Docker Swarm, Kubernetes, and Apache Mesos.

Docker Swarm

Docker Swarm is a Docker Inc. native tool used to orchestrate Docker containers. It enables you to manage a cluster of hosts as a single resource pool.

Docker Swarm makes use of overlay networks for inter-host communication. The swarm manager service is responsible for automatically assigning IP addresses to the containers.

For service discovery, each service in the swarm gets assigned a unique DNS name. Additionally, Docker Swarm has an embedded DNS server. You can query every container running in the swarm through this embedded DNS server.

See Docker Documentation: Manage swarm service networks ›

Kubernetes

Kubernetes Guide is a system used for automating deployment, scaling, and management of containerized applications, either on a single host or across a cluster of hosts.

Kubernetes approaches networking in a different way as compared to Docker, using native concepts like services and pods. Each pod has an IP address and no linking of pods is required, neither do you need to explicitly map container ports to host ports. There are DNS-based service discovery plugins which can be used for service discovery.

Apache Mesos

Apache Mesos is an open-source project used to manage a cluster of containers, providing efficient resource sharing and isolation across distributed applications.

Mesos uses IP address management (IPAM) server and client to manage containers networking. The role of the IPAM server is to assign IP addresses on demand while the IPAM client acts as a bridge between a network isolator module and the IPAM server. A network isolator module is a lightweight module that’s loaded into the Mesos agent. It looks at scheduler task requirements and uses IPAM and network isolator services to provide IP addresses to the containers.

Mesos-dns is a DNS-based service discovery for Mesos. It allows applications and services running on Mesos to find each other through the DNS service.

Read more on this wiki: Docker Networking ›